Router Firmware -- Dumping and Flashing
Introduction
If you've ever bricked a router with a bad firmware update and had to reload the firmware over a serial connection, then you may be familiar with much of what I cover here. If you don't even know what firmware is, this post is probably not for you. If you know what firmware is but don't know what I'm talking about with serial connections, keep reading; you may find this interesting.
In my particular case, I did not brick a router. The router in question was working exactly as intended by the manufacturer. No, I wanted to put custom firmware on it, and the manufacturer had locked the device down to prevent such modifications. That didn't stop others from exploiting a security hole in the parental control pages to run arbitrary code. Alas, my router had been upgraded with a version of firmware that patched that gaping hole.
In addition to these complications, I didn't have the custom firmware file that I needed for flashing. You see, the firmware I wanted to dump on my device is a customized version of dd-wrt, and it's only available pre-installed on routers sold by a third party I shall not name here. I got in touch with their tech support and asked if I could get a copy of the firmware. They declined. So now, in addition to my first problem of being unable to flash custom firmware, I was left with the second problem of not having the custom firmware to flash anyway.
As the saying goes, though, where there's a will, there's a way! You see I already had one device which I had obtained from the unnamed third party which was running their custom firmware. Since the unnamed third party didn't object to my suggestion of dumping their firmware off the device they sold me, all I needed to do was to find a way to get it off! The rest of this post documents my adventure in achieving my goal, putting the unnamed third-party's custom firmware on my hardware-equivalent, device which came with stock (Chinese) firmware.
The Router in Question
 |
| TP-Link TL-WR703N |
The device in question is a TP-Link TL-WR703N pocket router. This little gem has been featured numerous times on Hackaday. Given the fact that there's a dd-wrt build and since it's so stinkin' cheap, it's a deal that's hard to beat. It's a travel router, so it's only going to accommodate a single room or a very small flat.
On Amazon, it sells for about $26 at the time of writing. In China, it sells on taobao for 99RMB (about $15 USD). This same device sold by the unnamed third party with custom firmware costs 50 US dollars! You can see why it would be advantageous to purchase and flash myself! Seriously, a $15 device for $50 only to get a slightly customized version of dd-wrt?
The unit I purchased says the hardware is version 1.7, but I took it appart and compared it with the version 1.6 router I got from the third party, and while I didn't look at every little component, it appears to be the same machine. In fact, the TP-Link site does not post different firmware for the different hardware versions, so it's fairly safe to say that they're pretty much the same.
Making It Happen
By now, you're probably mumbling, "Get to the point already! What did you actually do?" I'm glad you asked. The first order of business was dumping the custom firmware off of the router I already had. Then, armed with the custom firmware, I could dump it onto the router I had that was running stock firmware. All of this was made possible thanks to the serial interface on the router board.
The serial port
There is an excellent write-up on connecting to the serial interface for this device on Instructables. I did not take things as far as Robotang does in his write-up. I simply soldered some wire onto the TX and RX pads (orange and yellow wires in step 4 of Robotang's write-up). I didn't bother with ground or power since I was going to get those with the USB cable when I plugged in (note that if you don't power the router from the computer that is running the serial connection, you may need to connect to ground as well). The USB serial adapter I used is a PL2303HX device much like this one. This device allows you to communicate with the router through its serial console.
I started with the router running custom firmware. I connected the TP_IN pad on the router to the TXD (transmit) pin on my USB serial adapter. I connected the TP_OUT pad on the router to the RXD (receive) pin on my USB serial adapter. Then I opened PuTTY and started a serial session @115200 baud with /dev/ttyUSB0 (I'm running Linux, and /dev/ttyUSB0 is my USB serial adapter).
For more detailed instructions on opening the housing of this router and setting up a serial connection, see my separate post on that topic here.
For more detailed instructions on opening the housing of this router and setting up a serial connection, see my separate post on that topic here.
Dumping the custom firmware
With everything hooked up, I connected power to the router, and I started seeing text fly in the PuTTY window. This particular router (and many other TP-Link routers) reaches a point early in the boot process where it waits 1 second before continuing to boot. The secret here is to type tpl before it continues. This can be tricky, so I just set up a keyboard macro to type tpl for me with a single keystroke. If timed right, the router drops to a debug mode denoted by a line that reads hornet> and waits there for user input.
From this interface, you can read and write the firmware in memory directly, but first you have to know where the firmware is located and how large it is. Like I said this router is a popular little guy, and there's all kinds of information about him online. The firmware starts in memory at 0x9f020000 bytes and is 0x3c0000 bytes long.
With the router in debug mode, I closed PuTTY and opened a regular terminal window (terminal A) in Linux. I started the terminal listening to /dev/ttyUSB0 so I could grab and save all of the output from the router using the following command:
$ cat /dev/ttyUSB0 | tee /tmp/firmware-dump.hexThen I opened a separate terminal (terminal B) in which to issue commands to the router's serial console. Particularly, I needed to issue the command to dump the installed firmware.
$ echo "md.b 0x9f020000 0x3c0000" > /dev/ttyUSB0At this point, a hex dump of the firmware started spewing out in terminal A. This was perfect because not only was it spewing out there, but it was also getting saved to /tmp/firmware-dump.hex. Once the text stopped flowing in terminal A (almost 30 minutes), I knew the dump was done. At that point, I had to convert the hex dump back to binary. In terminal B I ran,
grep -iP "^[0-9a-f]{8}:" /tmp/firmware-dump.hex | xxd -r > /tmp/firmware-dump.bin
The grep command cuts out the lines that aren't actually part of the hex dump, and the xxd command converts the hex dump back to binary.
At this point, the binary file was artificially larger than it should be because the first line of the hex said it was at 0x9f02000 bytes into the file, so I needed to extract the last 0x3c0000 bytes of the binary file. Since it's at the end of the file, all I need to do is jump 0x9f020000 (that's 2,667,708,416 in base 10) bytes into the file and dump everything from there to the end.$ dd if=/tmp/firmware-dump.bin of=/tmp/custom-firmware.bin bs=$[0x10000] skip=$[0x9f02] 60+0 records in 60+0 records out 3932160 bytes (3.9 MB, 3.8 MiB) copied, 0.00915638 s, 429 MB/sNote that 3,932,160 bytes were copied. Converting this number to hex, gave me 0x3c0000, so I knew for sure that I got the correct number of bytes for my extracted firmware. If I had left the PuTTY window open, this number would likely not be correct because some of the hex dump would have ended up in that window instead of in terminal A, and if it was missing in terminal A, then it would also have been missing from /tmp/firmware-dump.hex as well.
This /tmp/custom-firmware.bin file is the custom firmware that the unnamed third party was unwilling to provide. With the firmware in hand, I closed terminals A & B and was ready to move onto the next big step in my project, flashing the other router.
Flashing the custom firmware
As I mentioned earlier, the security holes that others have exploited to flash third-party firmware on this router were patched in the factory installed firmware on the device I received. The only way I was going to be able to flash third-party firmware onto my device would be over the serial connection, so I had to open up this unit as well and solder to the exposed pads for the serial connection in the same manner that I had done with the first router. Then I connected to my computer with the same USB serial adapter. I booted it up, interrupting the boot sequence with the tpl command like before and dropped to the hornet> prompt.
Flashing the firmware over a serial connection is accomplished by pulling the firmware down to the router over TFTP via ethernet cable. I dug out an ethernet cable, and connected my computer to the router. Then I set 192.168.1.100 on my machine as a static IP because this is what the router looks for. To confirm that this was the correct IP, I issued the printenv command in the serial console on the router.
Since the router wants to pull the firmware down over TFTP, I had to install a TFTP server and get it running. AskUbuntu has a quick answer about how to do that. I followed the directions there to get my TFTP server up and running, and then I dropped my custom-firmware.bin file into the /tftpboot directory.
There are numerous sites online that provide the commands to flash the firmware over serial. I'll list them out here as well. In PuTTY, I ran the following commands on the router.
Everything is running beautifully without any issue. I've saved the custom firmware for future flashing, and I'm finished!
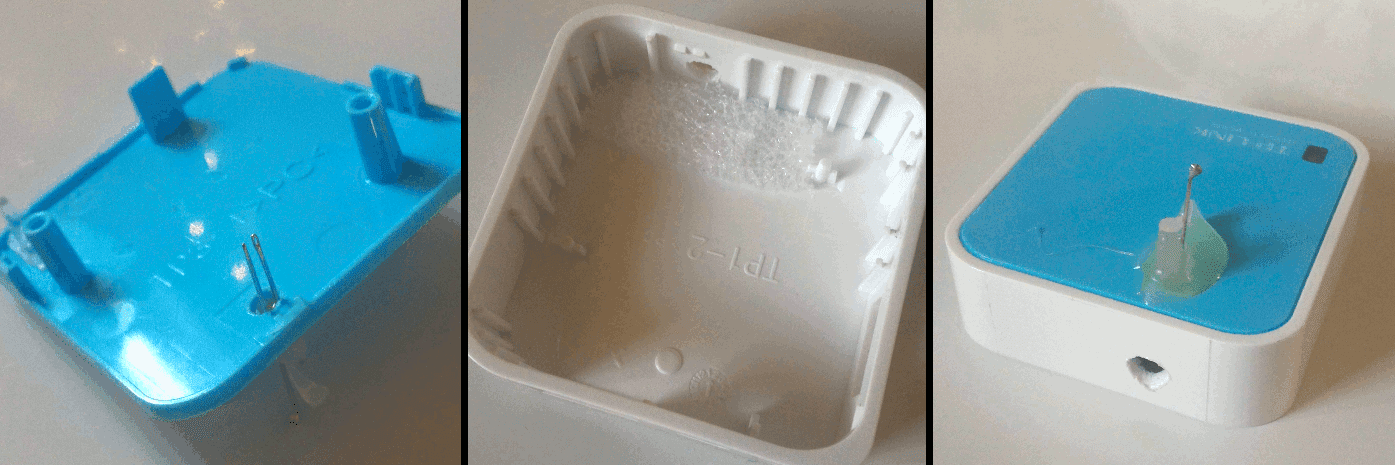 I didn't want to have to solder onto the pads every time I want to work with a router. To address this issue, I took a TL-WR703N router that had died and cut a hole in the case above the pads for the serial interface. I also cut a hole in the side by the pads so I could see what I was doing. Then I got two sewing needles and set them down through the hole on top on the pads. I glued them in place with some hot glue and now I can clip some alligator clips onto the needles to get access without having to solder anything. You can't see it in the picture, but there is a little bit of the left needle (which broke) sticking up out of the glue. The housing on these routers is a pain to take apart, so I also cut off the snap fittings, making it easier to take the top off. I added just a little bit of squishy padding in the bottom of the case under where the pads would be to ensure that the board always presses up against the needles. Now I can just drop a board in my modified case and connect to the serial console any time I need.
Alternatively, with a little bit of electrical tape, it is also possible to clip directly to the board with alligator clips to get serial access without soldering. Since the pads are so close to the edge, all you need to do is make sure that any potential contact points other than the serial pads on the upper and lower sides are covered, and then just clip on, making sure the alligator clips make contact with the pads. This can be tricky and may require small adjustments to get everything connected for the serial connection, but it works as well.
Flashing the firmware over a serial connection is accomplished by pulling the firmware down to the router over TFTP via ethernet cable. I dug out an ethernet cable, and connected my computer to the router. Then I set 192.168.1.100 on my machine as a static IP because this is what the router looks for. To confirm that this was the correct IP, I issued the printenv command in the serial console on the router.
hornet> printenv
bootargs=console=ttyS0,115200 root=31:02 rootfstype=squashfs init=/sbin/init mtdparts=ar7240-nor0:256k(u-boot),64k(u-boot-env),2752k(rootfs),896k(uImage),64k(NVRAM),64k(ART)
bootcmd=bootm 0x9f020000
bootdelay=1
baudrate=115200
ethaddr=0xba:0xbe:0xfa:0xce:0x07:0x41
ipaddr=192.168.1.111
serverip=192.168.1.100
stdin=serial
stdout=serial
stderr=serial
ethact=eth0

Environment size: 362/65532 bytes
The serverip variable denotes the IP address that the router will reach out to when it tries to fetch the firmware.
Since the router wants to pull the firmware down over TFTP, I had to install a TFTP server and get it running. AskUbuntu has a quick answer about how to do that. I followed the directions there to get my TFTP server up and running, and then I dropped my custom-firmware.bin file into the /tftpboot directory.
There are numerous sites online that provide the commands to flash the firmware over serial. I'll list them out here as well. In PuTTY, I ran the following commands on the router.
hornet>  tftpboot 0x81000000 custom-firmware.bin
dup 1 speed 1000
Using eth1 device
TFTP from server 192.168.1.100; our IP address is 192.168.1.111
Filename 'custom-firmware.bin'.
Load address: 0x81000000
Loading: #################################################################
         #################################################################
         #################################################################
         #################################################################
         #################################################################
         #################################################################
         #################################################################
         #################################################################
         #################################################################
         #################################################################
         #################################################################
         ######################################################
done
Bytes transferred = 3932160 (3c0000 hex)

hornet> erase 0x9f020000 +0x3c0000

First 0x2 last 0x3d sector size 0x10000                                       61
Erased 60 sectors

hornet> cp.b 0x81000000 0x9f020000 0x3c0000
Copy to Flash... write addr: 9f020000
done

hornet> bootm 9f020000
...
The first command pulls the firmware down to a temporary location in memory. The second command clears the stock firmware (or any other installed firmware) from the router. The third command copies the firmware we downloaded from the temporary location to its permanent space in memory where the router will look for it. Finally, the last command reboots the router. At this point my store-bought router booted up into the custom firmware! Success!
Everything is running beautifully without any issue. I've saved the custom firmware for future flashing, and I'm finished!
Case Modifications for Future Flashing
Alternatively, with a little bit of electrical tape, it is also possible to clip directly to the board with alligator clips to get serial access without soldering. Since the pads are so close to the edge, all you need to do is make sure that any potential contact points other than the serial pads on the upper and lower sides are covered, and then just clip on, making sure the alligator clips make contact with the pads. This can be tricky and may require small adjustments to get everything connected for the serial connection, but it works as well.

Has anyone sampled the various product mentioned here, and can they tell which one is the best?
ReplyDeletebest wireless router for under 100 USD